Documentation for Themedy Themes

WordPress Child Themes (Thesis & Genesis)

Please Read Before Continuing!
The following documentation assumes you've worked with the WordPress publishing platform before and have, at least, basic knowledge of it. If you want to brush up on WordPress itself please refer to the documentation found on WordPress.org.

Table of Contents

  1. Basic Theme Installation via Wordpress Admin
  2. Basic Theme Installation via FTP
  3. Final Installation (Thesis Only)
  4. Final Installation (Genesis Only)
  5. Custom Styles and Functions
  6. Using a Custom Header Image or Site Text
  7. Using a Custom Homepage (if available)
  8. Using Page Templates
  9. Explanation of Child Theme Settings Page
  10. Using Theme Widgets
  11. Importing Demo Content
  12. Using Custom Menus
  13. Themedy Shortcodes Overview
  14. Explanation of Portfolio Functionality (if available)
  15. Explanation of Photos Functionality (if available)
  16. Finding Category ID's
  17. Frequently Asked Questions

Back To Top

1. Basic Theme Installation via Wordpress Admin

This method is the easiest installation procedure and is recommended. If you find that this method is not working for you, move on to FTP installation (the next section).

  1. Log into your WordPress Dashboard, select Appearance and then select Themes.
  2. Select the large Install Themes tab and then select Upload.
  3. Click Browse, find and select the theme file you downloaded from Themedy.com, then click Install Now.
  4. Wait for the child theme to install, then click Activate. If you're unable to see or activate your child theme, try the FAQ for help.
  5. If you're using the Thesis 1.X framework, please go to the Final Installation (Thesis Only) section. If you're using the Genesis framework, please go to the Final Installation (Genesis Only) section.

Back To Top

2. Basic Theme Installation via FTP

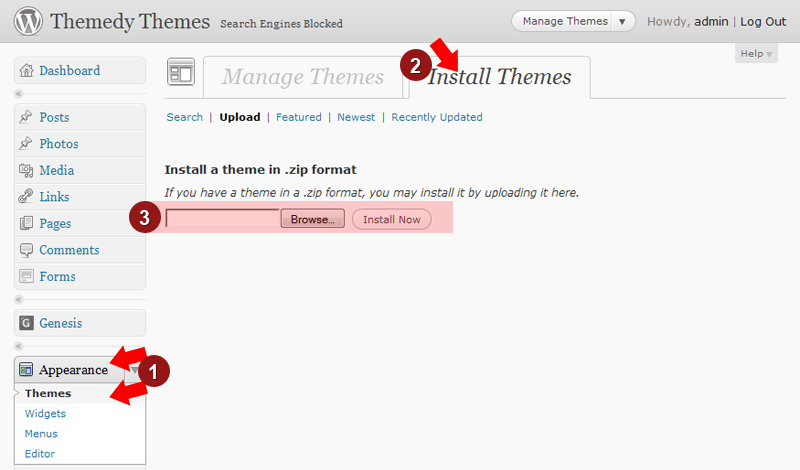
This method is recommended if you are having issues with the method above.

  1. After downloading the theme zip file from Themedy.com, extract the theme folder somewhere.
  2. Using an FTP client access your host web server and locate the wp-content/themes directory.
  3. Upload the theme folder you previously extracted to the wp-content/themes directory.
  4. Log into your WordPress Dashboard, select Appearance and then select Themes.
  5. In the Available Themes section, click on the child theme title and click Activate. If you're unable to see or activate your child theme, try the FAQ for help
  6. If you're using the Thesis 1.X framework, please go to the Final Installation (Thesis Only) section. If you're using the Genesis framework, please go to the Final Installation (Genesis Only) section.

Back To Top

3. Final Installation (Thesis 1.8.X Only)

If you're using Thesis 1.8.X, please continue on with these steps. To complete installation, you have to import Thesis design options (which will rewrite your current ones, so you should back them up * ).

  1. After activating your theme in the WordPress admin as shown previously, select Apperance and then select Themedy Settings
  2. When you first activate the theme you will have the option to import your options (2b). If the message box isn't showing (you do one or the other you don't need to import the options twice) click on the button labeled "Import Recommended Design Options (2a)" and a popup will appear.
  3. Press OK and let the page load. You should get a notification that the import was successful.

* It's optional, but if you would like to back up Thesis options, Go to Thesis > Manage Options > Download Options. Click the Download All Options button. When prompted, save the file to your local computer.


Back To Top

4. Final Installation (Genesis Only)

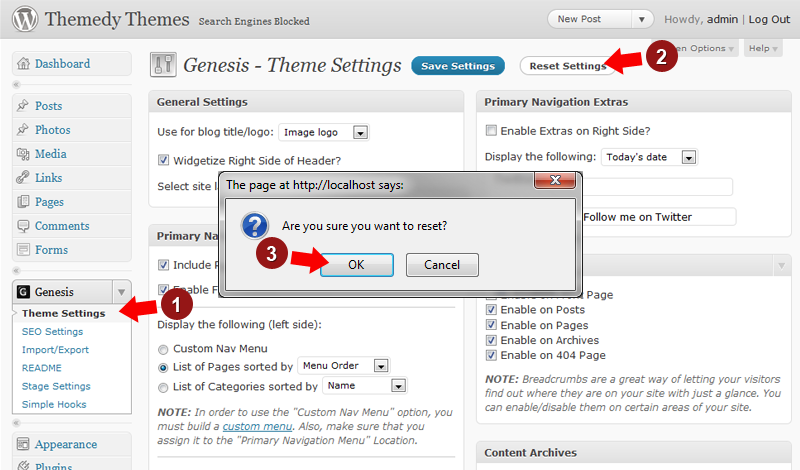
Although it may not be necessary, if you're using the Genesis framework you may want to reset its options to have the child theme work optimally. Check out your site and if you find some things look or act strangely follow the next few steps.

  1. After activating your theme in the WordPress admin as shown previously, select Genesis and then select Theme Settings.
  2. Click on Reset Settings and a popup will appear.
  3. Press OK on the popup and let the page load. You should get a notification that the reset was successful.

Back To Top

5. Custom Styles and Functions

You will find a "custom" folder in your Child Theme folder. In it will be a style sheet file: custom.css and a php file: custom_functions.php. Use these ONLY if you know what you're doing!

The following steps are for Genesis users only, as Thesis already has custom styles and functions support.

  1. To change styles you will first need to access your Child Theme Settings page, found under Appearance -> Themedy Settings.
  2. Once there check the "Use the custom.css style sheet?" option under Appearance.
  3. Click Save Settings. You can then open up custom.css and make any CSS changes you want.

To add functions simply open custom_functions.php, write your functions and save. For a list of functions and development tools please check out the StudioPress dev site: http://dev.studiopress.com/

NOTE: If you do make changes, make sure to back up the "custom" folder when updating the child theme.


Back To Top

6. Using a Custom Header Image or Site Text

Most themes come with a header logo or banner that can be switched out with either your own image or just plain text.

Changing the Image

You may change the logo or banner by uploading a new logo.png or banner.jpg to your child themes images folder. You have to have Image Logo selected (shown below) in order for your custom image to show up.

Switch Between Image and Text

  1. Log in to your WordPress admin and select Apperance and then Themedy Settings.
  2. Once there, under General Settings you can switch the drop down between Image Logo or Dynamic Text.

Back To Top

7. Using a Custom Homepage (if available)

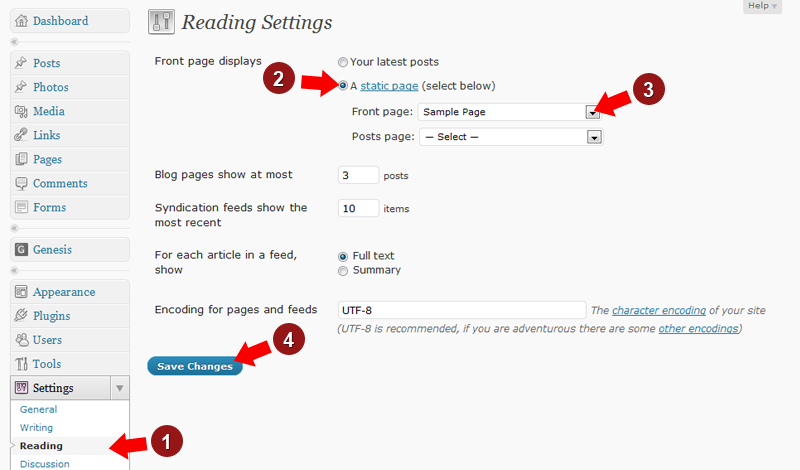
If your theme came with a custom homepage it should take over your site's front page automatically, but you may need to do a few things to get it set up.

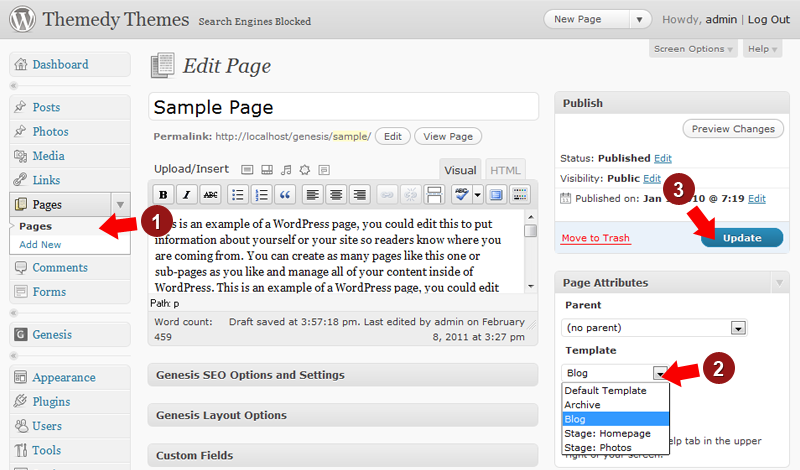
NOTE: If you want to set up a blog page separately, you need to use a page template. Please read the section on Using Page Templates if you're unfamiliar with them.

Disabling a Custom Homepage

If you want to use another page for the homepage you can do so via WordPress Admin.

  1. Log in to your WordPress admin and select Settings then Reading.
  2. When loaded, check A static page (select below).
  3. From the Front page drop down, select a page you want to use for the front page.
  4. Select the Save Changes button and let the page reload. You should get a notification if successful.

Back To Top

8. Using Page Templates

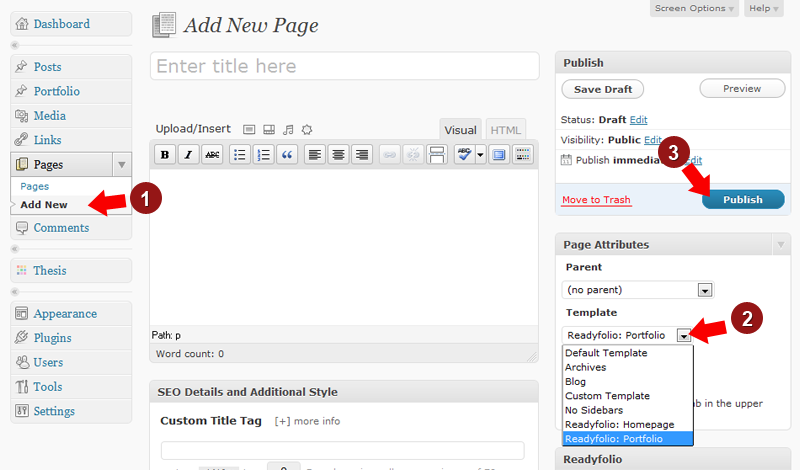
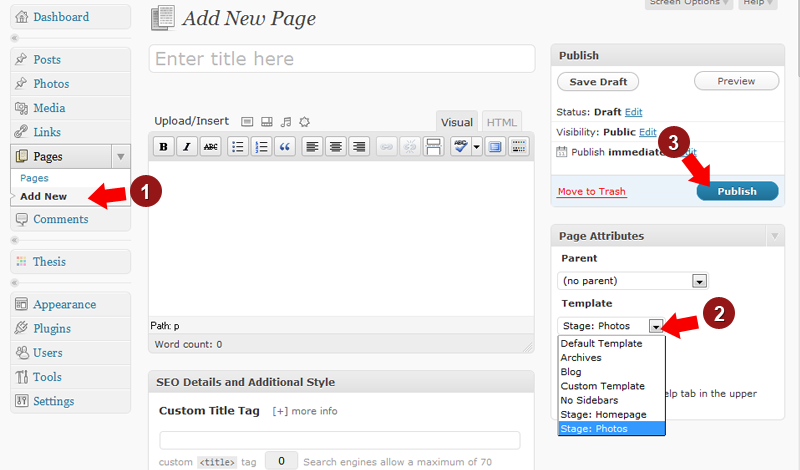
Most Themedy themes include page templates for various functionality (blog template, photo gallery, custom homepage.etc). To use a page template follow these steps:

  1. Log in to your WordPress admin and select Pages to either add a new page or edit a current one.
  2. You will find the Template drop down under Page Attributes. Click on it and select your custom page template.
  3. Select the Update or Publish button to save changes.

Back To Top

9. Explanation of Child Theme Settings Page

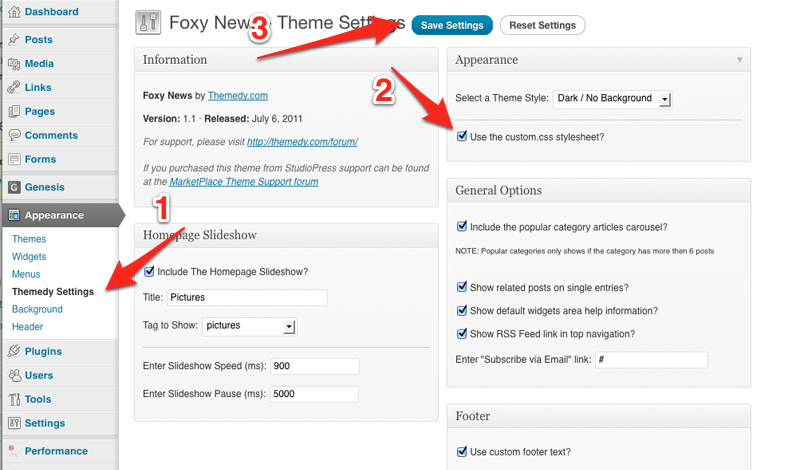
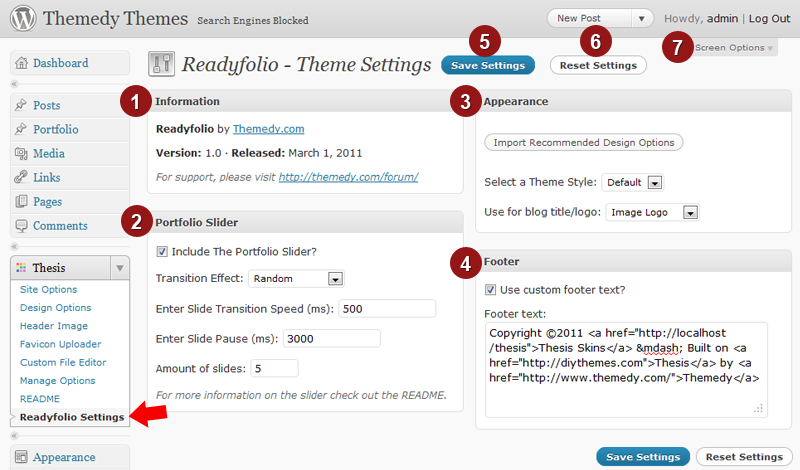
The following is an explanation of an basic child theme settings page. To access your child theme settings, log in to your WordPress admin and go to Appearance -> Themedy Settings. Not every theme will have all of the options below and some themes may have further options available.

  1. Information: The current information for your active Themedy theme.
  2. Slider: If your theme contains a slider (for posts, photos, portfolio items.etc) you can edit the options here. Sliders will have different options depending on the theme, but usually contain an effect drop down and fields to change different variables.
  3. Appearance: This part of the settings panel contains appearance related options. Change your theme style, import design options (Thesis only), or select whether to use an image for logo (Thesis only).
  4. Footer: Edit the contents of your footer here or disable the custom footer altogether.
  5. Save Settings: Click this after making changes to save your current settings.
  6. Reset Settings: Click this to reset all your Themedy child theme settings to default.
  7. Screen Options: For accessibility purposes, use this area to change which boxes appear and how many columns to use on the current page.

Back To Top

10. Using Theme Widgets

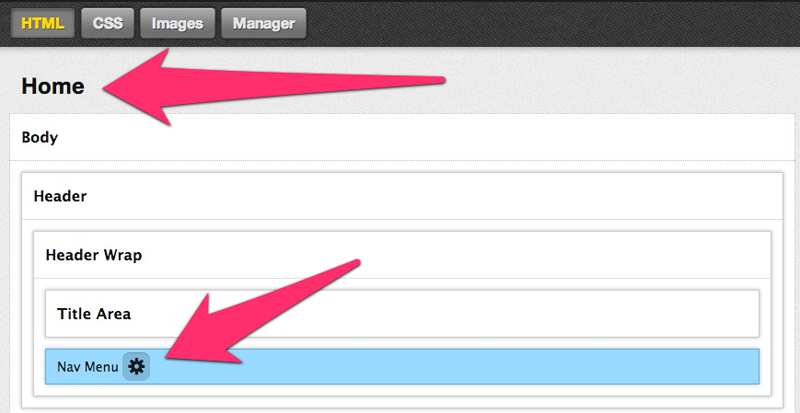
Every Themedy theme uses Genesis or Thesis widgetized sidebars and may add various other widget areas. Some themes will also have custom widgets available for the homepage or other pages. To see your widget areas and available widgets follow the steps below:

  1. Log in to your WordPress admin and select Appearance then Widgets.
  2. You will find your available widgets on the left. Click and drag widgets from here to the available widget areas on the right.
  3. When you drop a widget you will be able to edit any options it has available.

NOTE: Some areas might require certain widgets, so make sure to check out the theme's README for instructions if that's the case.


11. Importing Demo Content

If your theme has the demo content available you can import it over to your own site.

Importing WordPress Post / Page Content

If you want to use the demo content, you can import the XML file using the WordPress Importer tool. (How to Import a WordPress XML file)

Importing Sidebar / Widget Data

  1. Download the Widget Importer Plugin and install
  2. Go to Tools -> Wideget Settings Import in your WordPress admin.
  3. Upload the .json file you downloaded from us (if you downloaded a .zip file - extract it first)
  4. Click the Show Widget Settings button, then Select All Active Widgets and click Import Widget Settings

Note: If you download a .zip file make sure to extract it first before using these tools!


Back To Top

12. Using Custom Menus

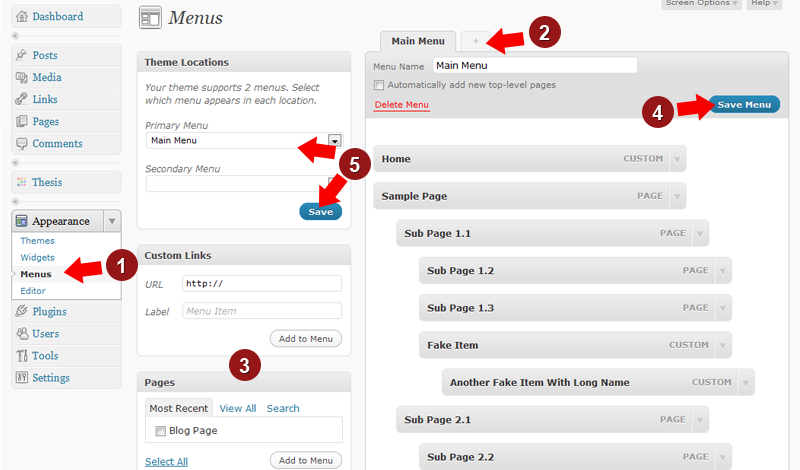
Use the WordPress built in menu options for your sites.

  1. Log in to your WordPress admin and select Appearance and then select Menus.
  2. Click the "+" button to create a new menu and name in in the Menu Name area.
  3. Add items from the left areas (Custom Links, Pages, or Categories) by selecting them and clicking Add to Menu in each area.
  4. Click Save Menu to save your new menu.
  5. Assign your menu by using the drop down in the Theme Locations box to select your menu name and hit Save.

Thesis 2 Users

- Set your menu using the skin editor as shown below:

Thesis 2 Set Menu
Back To Top

13. Themedy Shortcodes Overview

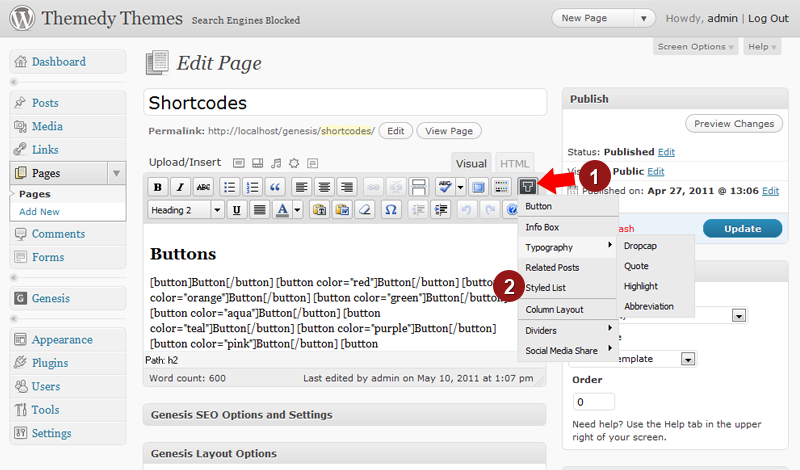
Every Themedy theme comes loaded with custom shortcodes to make your life easier. These shortcodes will work in posts, pages, widgets, and templates. To take a look at the shortcodes in action, head over to the demo section and click on the Shortcodes page.

Adding Shortcodes The Easy Way

We've made the process simple- follow these steps to use any of our available shortcodes:

  1. When your in a page or post edit screen, find the Themedy icon in the visual content editor. Note if the "T" is not there then you probably have not installed (or activated) the Themedy Visual Designer plugin (used in all themes starting at version 1.1 and up)
  2. Select your desired addition and click on it. Some shortcodes will prompt you with more options, while others will be inserted immediately.

Usage in Templates

Shortcodes can be used in template files by using the do_shortcode() function. For example, if you wanted to use a Twitter shortcode somewhere in your template file, you would add this code:

<?php echo do_shortcode('[twitter]'); ?>

Adding Shortcodes Directly

If you want to bypass the visual insert option or need to add a shortcode in a widget, you can add them using the code below.

Buttons

[button]Button Text[/button]

Info Boxes

[box]Info Box Text[/box]

Typography

[dropcap]D[/dropcap]ropcap
[highlight]Highlighted Text[/highlight]
[abbr title="Place Full Text Here"]Displayed Text[/abbr]
[quote]Quoted Text[/quote]

Related Posts

[related_posts]

Styled List

[list]
	List item 1
[/list]

Column Layout

[twocol_one]
[twocol_one_last]

[threecol_one]
[threecol_one_last]
[threecol_two]
[threecol_two_last]

[fourcol_one]
[fourcol_one_last]
[fourcol_two]
[fourcol_two_last]
[fourcol_three]
[fourcol_three_last]

[fivecol_one]
[fivecol_one_last]
[fivecol_two]
[fivecol_two_last]
[fivecol_three]
[fivecol_three_last]
[fivecol_four]
[fivecol_four_last]

[sixcol_one]
[sixcol_one_last]
[sixcol_two]
[sixcol_two_last]
[sixcol_three]
[sixcol_three_last]
[sixcol_four]
[sixcol_four_last]
[sixcol_five]
[sixcol_five_last]
            

Dividers

[hr]
[divider]
[divider_flat]
            

Social Media Share

[twitter]
[tweetmeme]
[reddit]
[stumble]
[digg]
[facebook]

Back To Top

14. Explanation of Portfolio Functionality (if available)

If your theme is a portfolio type theme, it comes with unique new functionality explained in this section

Portfolio Post Type

Once the theme is activated you will find a new menu item in your WordPress admin called Portfolio. Here you can add/remove/edit portfolio items (like you would normal posts). Make sure you set a Featured Image (How to Set a Featured Image) to have it show up in the slider and portfolio page.

Setting up the Portfolio Page

  1. To set up the portfolio page, login to your WordPress admin and create a new page by clicking Pages > Add New.
  2. In the edit screen to that page, on the right hand side under Page Attributes find the Template drop down option. From the drop down select "Portfolio". Note: This page should not be named Portfolio or you will get 404 errors, use something like Work, My Work, My Portfolio etc.
  3. Make sure to name your page then click Update or Publish. That page will now list all of your portfolio items.

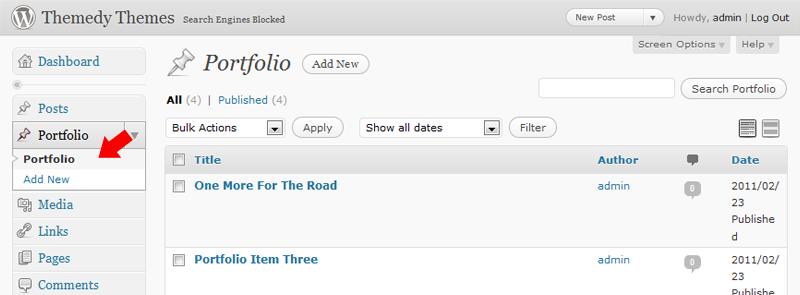
You can also have your portfolio page show a specific category by using the drop down under Portfolio Category.

Single Portfolio Items

If you're having issues with the single portfolio items pages not showing up, try going to Settings > Permalinks on the left hand side of your WordPress admin and hitting Save Changes.


Back To Top

15. Explanation of Photos Functionality (if available)

If your theme is a photo type theme, it comes with unique new functionality explained in this section

Photo Post Type

Once the theme is activated you will find a new menu item in your WordPress admin called Photos. Here you can add/remove/edit photo items (like you would normal posts). Make sure you set a Featured Image (How to Set a Featured Image) to have it show up in the slider and photos page.

Setting up the Photos Page

  1. To set up the photos page, login to your WordPress admin and create a new page by clicking Pages > Add New.
  2. In the edit screen to that page, on the right hand side under Page Attributes find the Template drop down option. From the drop down select "Photos".
  3. Make sure to name your page then click Update or Publish. That page will now list all of your photo items.

Photo Galleries

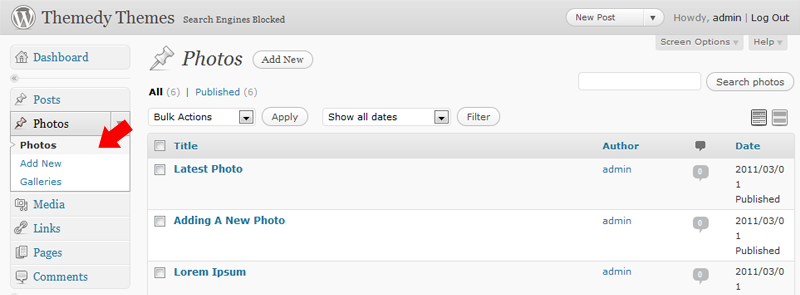
Galleries are used the same way as tags. When you are editing a photo item, you can add gallery tags by using the Galleries box to the right of the post editor (under Publish).

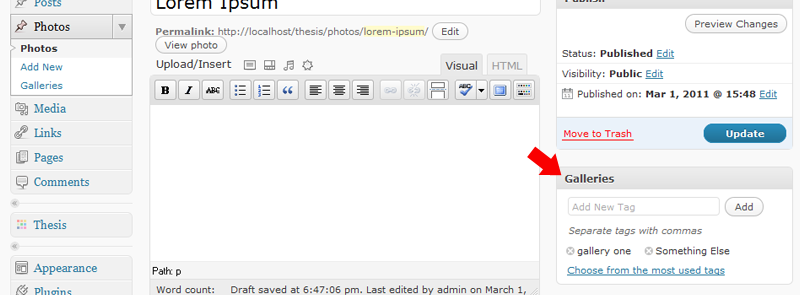
Galleries are used to group similar photos for both you on the back end and visitors on the front end. They also have other uses depending on the theme (sliders, slideshows.etc).

Single Photo Items

If you're having issues with the single photo items not showing up, try going to Settings > Permalinks on the left hand side of your WordPress admin and hitting Save Changes.


Back To Top

16. Finding Category ID's

If your theme has a slider it may ask you to enter IDs if you want to limit slides.

Where is the Categoy ID?

If you don't know how to find a ID of a category, page etc you should install the WP Show IDs plugin this will add a new column to your list of categories / pages with the IDs

Finding IDs of different types (activate the plugin above first)

  1. Posts: Create a category and assign it to the posts you want to show up in the slider then goto Posts -> Categories to get the ID
  2. Pages: Go to Pages -> All Pages and get the page IDs of the pages you want to show up in your slider.
  3. Portfolio: Create a category and assign it to the portfolio items you want to show up in the slider then goto Portfolio -> Portfolio Categories (or Portfolio -> Categories) to get the ID.

Note: You don't need to enter IDs into the Themedy Settings page, if you don't the slider will just select all the recent items from that category. If you have any issues with the slider it's probably due to not having the right IDs - double check them.


Back To Top

17. Frequently Asked Questions

"Thesis Error: Warning: require_once… errors or The parent theme is missing. Please install the "thesis_185" parent theme"

If you're getting this error, it means your Thesis folder is called something other then "thesis_185" or that you are not running the required version of Thesis (1.8.5) To fix this, you should do ONE of the following options:

Option 1: Download Thesis again and upload another copy of it to your themes folder as shown by the official steps here, http://diythemes.com/thesis/downloads/install/. You should then be able to go back through the install steps and activate your child theme.

Option 2: Rename your current Thesis folder:

  1. FTP into your server and find your themes folder (wp-content/themes/)
  2. Locate your Thesis folder and rename it to thesis_185
  3. You should be able to now go back through the install steps and activate your child theme.

Option 3: Edit your Child Theme stylesheet to reflect your Thesis folder name:

  1. Find and open style.css that's in your child theme folder.
  2. Near the top find Template: thesis_185. You can change thesis_185 to whatever your Thesis folder is called (eg. thesis).
  3. Save and you should be able to now go back through the install steps and activate your child theme.

"Some features or options aren't working"

Firstly, some features are exclusive to certain themes while other features should work across all themes. For example, only a couple themes have portfolio functionality while every theme should include custom shortcodes.

If you still find a feature not working, make sure your theme is up to date. Go to the downloads page and compare your version to the newest available version. Some features may have been added after you downloaded your theme. Update if necessary.

"Thumbnails or other post images are not sized correctly"

Make sure you have large enough images for the areas you want before adding featured images. Some areas, like sliders, require larger sized images so make sure you note that before uploading anything.

If you're installing a theme on a site that already has multiple featured images and thumbnails, those images will need to be re-cropped for the new theme sizes. The easiest way to do that is with a plugin called Regenerate Thumbnails available here: http://wordpress.org/extend/plugins/regenerate-thumbnails/.


Thank you for purchasing and using our themes. We hope you enjoy using them as much as we enjoy making them!